Wednesday 4 July 2018

I finally have a Plane !!!!!!!!!!!!!!

Yes, As the title goes I am at that point now where I fully believe I have a reliable, functional, trustworthy and dead set awesome aircraft.

I have sort of slowly come to this conclusion over the last few weeks as I now have quite a few hours on the clock where I have done nothing more than put fuel in the plane and look at things. The cooling system is going better than I could have imagined and the 3d printed engine mounts are working so well I almost can't believe it. The plane is running like a Singer sewing machine so I have nothing at all to complain about. Go figure that from me.

I have been doing Aeros, Formation, Circuits, Nav's , Pfl's you name it and the plane has just been going great. I have been flight testing using blends of Avgas and Premium Unleaded 98 octane with results that are looking promising. In my last plane with the Aerovee I had major cooling issues and the Premium fuel was not really viable as the temps were a little higher. I am glad to say though with this engine and unleaded fuel the temps have so far shown no noticeable increase and the engine runs exactly the same as with straight avgas.


I'm really positive about how the plane is going now that I actually am starting to trust it a little. I'm not quite ready to go over tiger country just yet or down our coastal corridor but those days won't be far away at this rate. My next wish list is to carry out a dynamic prop balance to hopefully make it run that extra bit smooth. I will report how that goes when or if I can make that happen in the not too distant future.  


So signing off now with a big Double Thumbs Up.

 Sonex 1645 

VH-VWS


Engine mounts


So I got to that point once more where the prop flange was rubbing on the cowling again. This time though I was ready for it. 


 I had gone out on a limb following some info from the Sonex builders' site, bought a 3d printer, assembled it, went through hours of testing, learning and experimenting to a point where it would actually print stuff. Then came the next steep learning curve of making a good engine mount design in a 3d Cad software modelling program. Luckily I was aided in that little fast track education process by my 16 yr old daughter busting one out in about 10 mins on the computer with myself giving her the measurements via a set of verniers. 

Next challenge printing in flexible filament. Actually that part wasn't too bad really. Once the basics were sorted out with the printer in general the flexible filament part was manageable. I quickly learn't at certain  times, like temp changes or layer height speed changes, not to be too far away as usually only on those few moments during the 3x hour each print, the filament may jam. One needed to be ready just in case.   


I probably spent more hours learning how to get this all sorted than I care to actually recognize but it was definitely worth every second. 


So this was the cowling before I changed the mounts, I think I set an all time record for how long these ones lasted at about 8 x hours. I had done quite a few aeros and so on so that's probably why they were eaten out so quickly. Hopefully this will be the last time I post pics like this. 


So here are my newly fitted engine mounts and these pics were probably at about the 2 x hour mark. I have to admit the washers were not sized very well as i made the bushes 42mm over all up from the standard Sonex bushes at 32mm. I also made the smaller inner section 1 mm longer so they have a bit more squish factor where the accessory case sits on the bush. I have had the skeptics place their opinions and I have also had plenty of support for the choice I made in regard to using a 3d printed part on the plane. We will see how it turns out no doubt and I will report honestly either way how they go. 


I have to admit though I was really secretly chuffed about the colour choice I made for blue filament. I just think they look great. lol..... The red anodized material and the blue just do it for me :)


Sunday 22 April 2018

Turbo cooling system install

The turbo cooling system is working really well for me so far. Flight temp is usually about 180-200 f in flight and post flight steadily drops on shutdown, everything looks good.

 I have followed Sonex's recommendations about some components but have gone out on my own on some others as well.

I bought a Davis Craig electric water pump but it was just seriously too big for what I needed it for. The hoses outlets were 19 mm and the radiator I chose was only 10 mm outlets. I ended up buying a Solar hot water re-circulation transfer pump of eBay. It was about $20 and has a low amp draw. It seems to give a healthy enough transfer flow rate as you can view it in the header tank when running to see the flow.

I have not bothered to use a temp cutout switch or make it run in any form of auto mode I just manually switch it On and Off.  I find by the time I have filled out the daily flight record and brought the plane in, do this and that, the temps have come down quite satisfactorily.

The radiator is a standard cpu cooling radiator.  No way was I going to shoe horn a large trans cooler into the cowling. It's just way to big and I think inefficient for the intended application. I have no real faith in the cheap cpu radiator either but surprisingly it seems to be made quite solidly with a fair amount of meat in the material used so it may actually last a long time.

I have used a standard computer fan for the post shutdown cooling but leave it on all flight anyway.  I have just used this fan for ease of the install and I really don't care about what all the yardy yar on the Sonex forums predicted about the world ending if it was used. I can see if it last's a year and if it does change it out at the annual or maybe we might be surprised and the $12 eBay fan may keep going for ages. Who knows. It could certainly do with a better fan installed no argument as the air draw the fan provides is really quite pathetic. As it is atm I just don't have the room for the larger fan so will worry about that later. My aim is to work out how to get this 3d printer working well and make a duct so I can remotely mount a better fan and connect it that way.


Small 2 x pass aluminium  radiator.


Inlet vent


Top side inlet vent


Header tank and coolant pump


Overall install


Manual switch with light on to remind you its on. 


I think the only thing that is a pain with my install is that I have to have the pump on the check the water level. The header tank historically needs to be in the highest point for this obvious reason. The options were limited for me with real estate on the firewall to mount things so I chose the only other option I had. It works OK for me. I'm sure someone else could possibly put more thought into it and mount it all differently but I just want to fly so got it going the easiest way possible. 

Sunday 18 March 2018

Turbo cooling addition

Well I'm onto the turbo cooling addition now for the time being. I am probably going in the wrong direction but that's what I'm about these days. I can't make it worse and it can only help so lets see how this install goes.

I have used the base line parts recommended from Sonex but mine being the Legacy model the stuff just ain't gonna fit. I don't need another disc brake kit where nothing fits arriving so I have gone it alone. I have chosen a small 2x path multi core radiator in the hope it will be a lot more efficient than the big trans cooler they have on offer as the solution. I could be wrong and will find out soon enough. It seems to fit in with my cowl well so here's to some good luck coming my way.


So first things first I chose to use metal cooling fittings on the housing. This soon turned out to be mistake number 1. The service bulletin Aeroconversion turbo drain sump impedes the hose connection so off that came for a little love from the bastard file.   I bore myself a path for the hose and refitted the sump with the new all access hose connected. For the true conservatives out there I wont be using those hose clamps either by the way. They are just there till I buy some good ones.


Next the oil filter had to move. Lucky the wife came in to share my Sunday undoing the nuts on the other side of the firewall as I never installed Riv nuts. Do yourself a favor anyone reading this and use riv nuts or encapsulated nuts or anything other than straight nut and bolt like I did. That way you won't have to share the pain of working on your plane and not having to rely on others for this endeavour would also be good.

I am not sure if the header tank will be any good in this position. The cap is easily removed but only with the cowling off. My aim is not to have to take the cowling off to pre flight it but I will for the next foreseeable future until the system proves itself or not. I am hoping to bleed all the air out of it with the electric pump running and if all goes well and it doesn't reach boiling point the water level should be fine and managing and monitoring temps should indicate to me if I have a loss of coolant issue or not.


 This is my cute little radiator. I can double it in size if I need to but will trial the small one first as it fits under my current vents in the cowling perfectly. I hope with all the air flow in flight it will work well. It's obviously not fully mounted yet and I haven't decided exactly how I will mount it but along these lines seems easy enough with some cowling seal on the top to seal the canopy onto the rad.


I will take this fitting off again and install the old type CHT sensor back under it again. I really want to see the difference in temps from before and after the cooling mods to see if I need to add a larger heat exchanger or not.


I don't have any pics of the SP-7 install. Not much to tell really on that front. I stole a power and earth from the SP-6 in the back, tapped into the can lines, plugged it in and guess what?  Yep it works. I will mount it on Valco as the Mgl dealer suggests, under the seat and close to the center of rotation. It should be good. Just need to clean up the wiring a bit and tie it all down.


Bit of an Update

Well I'm only at about 63 x hours now. I have managed to crack about an almighty 10 x or so from October last year. I've just had one problem after another on the plane and am truly sick of even going out to the airport and looking at it.

I'm completely bummed about it all at the moment. After the Second turbo seized up I just wanted to give up. I'm still going on auto pilot but sheesh.

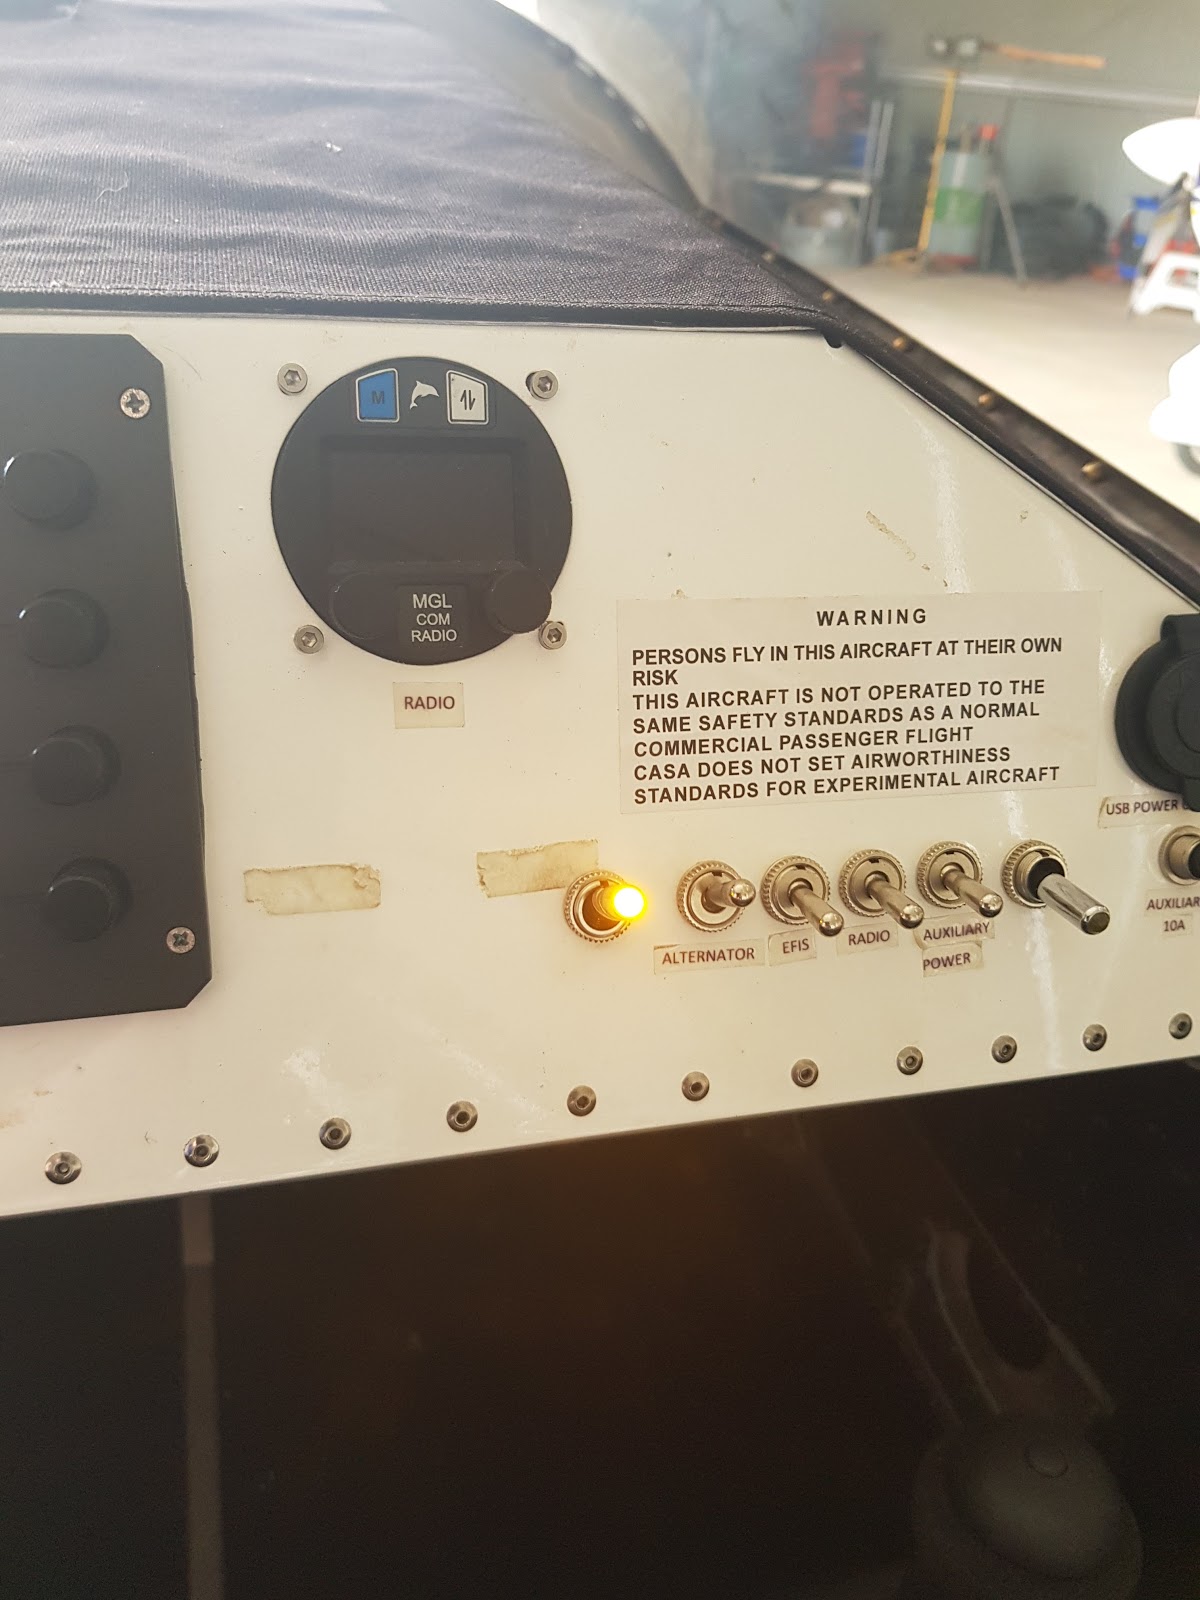
Right as we speak I am in the middle of the Annual inspection and service that seems to be dragging on as I just haven't had time to get to it lately. Whilst this is going on I am fitting an external SP-7 artificial horizon module and also carrying out the addition of a cooling system to the turbo. I hope to be flying again by the end of April at the latest, as Easter and some planned holidays in April for a Formation endorsement will take up my time also.

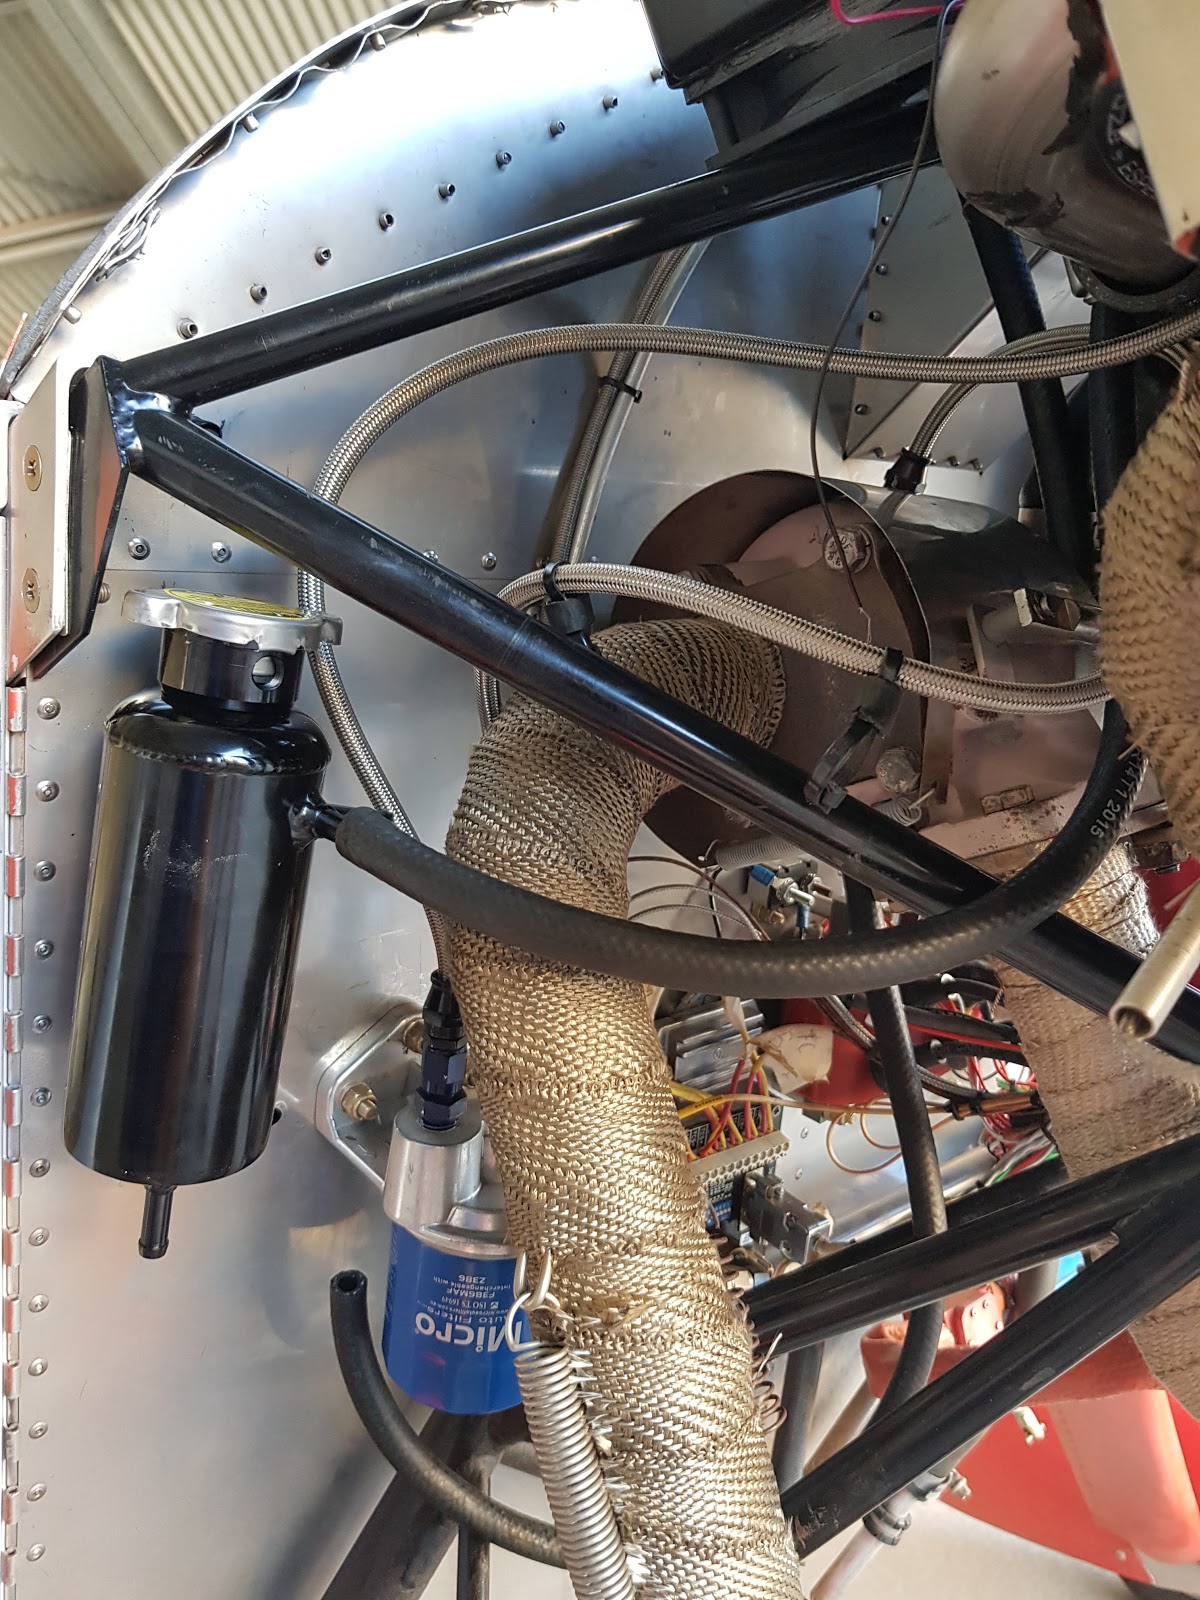
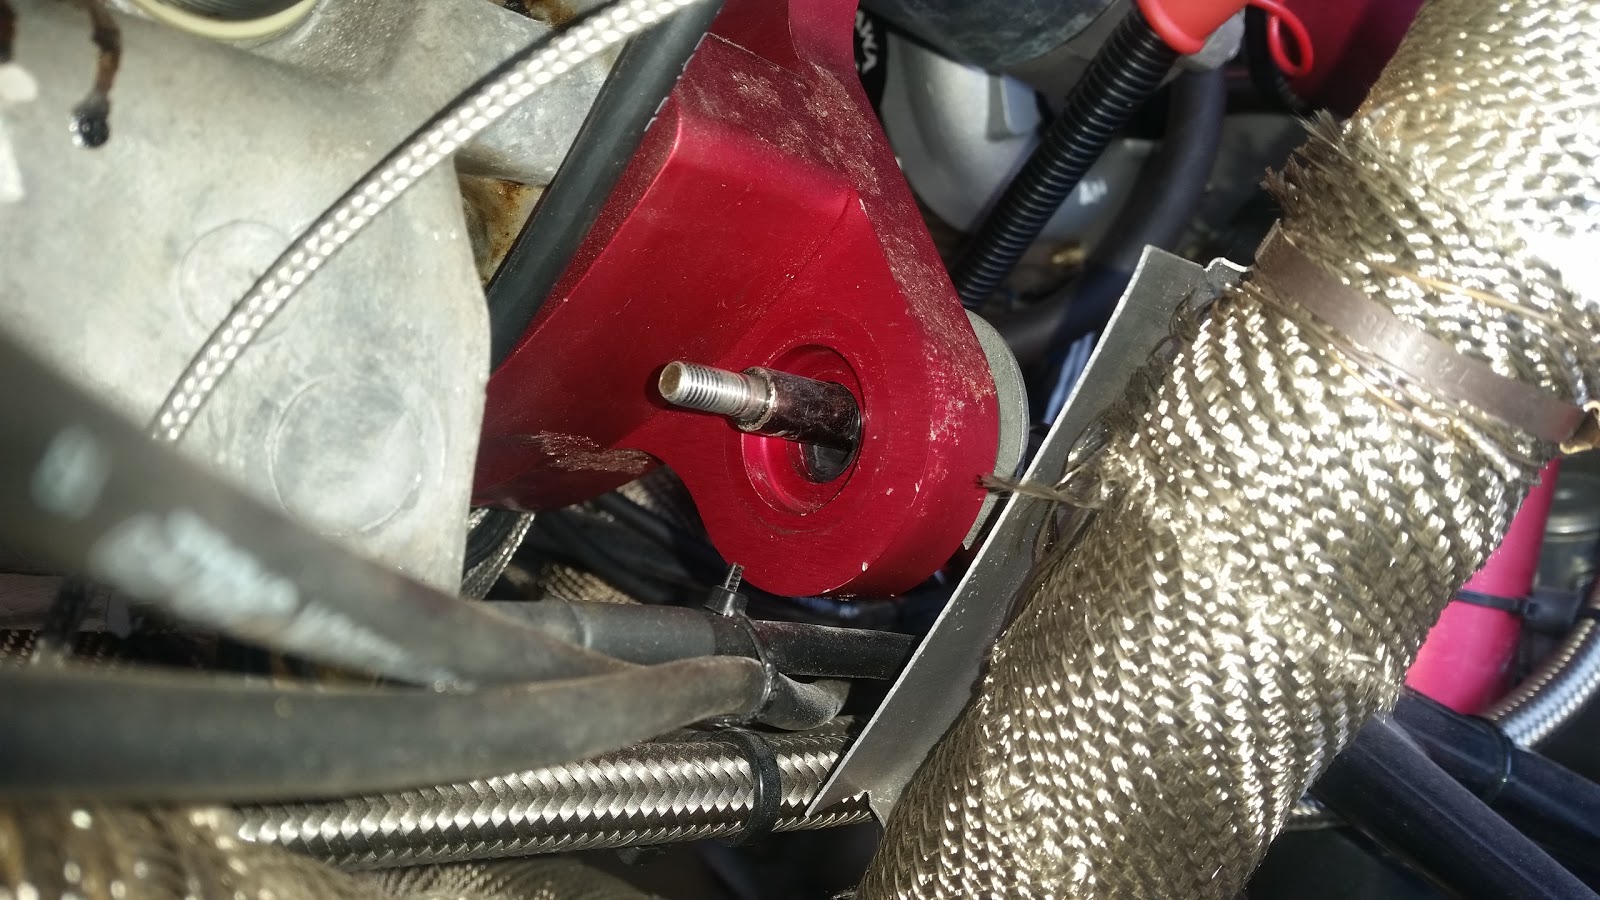
I think the biggest bane in my aircraft are the engine mounts. I fitted a complete new set again and some 2 x hours and possibly 2 or 3 flights and the top mount looks like this again


I am positive the lower mount will chew out again and be rubbing on the accessory plate all too soon.  In case you were wondering whether I had not done them up tight enough, I had them tight, trust me. I have tried them mildly tight, overly tight, bulging out tight,  just right tight and even had hose clamps around them too to try and get some longevity out of them to some degree. Nothing seems to work. I have even joked to the point of asking Sonex tech to fly over and sort the issue for me if I pay for the ticket. No reply to that question and frankly I didn't actually expect one either to be honest. It would be nice though as this is getting beyond a joke.


On a bright side the plane flies really well still. I have just finally achieved my Aerobatics endorsement and have now flown my first Aero's in my own plane. It was a long moment coming as I had always intended one day to be able to do them in the Sonex and here we are. Loops, rolls, barrel rolls and stall turns are all that I have done so far. I was going to try out some spins but alas my engine mounts foil me again. Unfortunately I don't have any pics or vids but sooner rather than later I'll buy a cheap HD cam and get some vids and so on for you tube. I am really happy in the way the plane performed in all the maneuvers. It had plenty of power for loops and so on and just flies the path you ask it. Stall turns in the plane I did my test in were a real mission whereas in the Sonex it seems almost like the Super Decathlon and they seem to do them almost by themselves. 

 Please note, YES I had the Sonex hat on for all flights :)


I did do one away mission this year. It was a 2 x hour return flight to an Old Aero club member's station in the Mid west of Western Australia. Was good to get away from the field for a change and was really hoping at this stage all the issues were behind me. Errr no by the way. Just in case you were wondering. 


Got my self a Sonex shirt now too,,,, I didn't really like the other one I had with the upside down plane. Was just too hard to focus on. I like the new one :) 


I did get to take my mate for a fly too along the way. Something else I had been meaning to do. We were a bit squishy,,, neither of us ever really miss the second helping :) 
 I still have a long list of people keen to fly with me but it's a bit hard to tell them it's broken again. like WTF they keep saying. 


So just finishing off, here are a few pics from the last 10 x hours and my engine mounts.

The October engine mount replacement pics. 


The November Files of engine mounts


The December attempt at stainless steel zip ties. 


They didn't last long and were changed out on the 14th January. Actually they wern't that bad really this time but the secondary bush was so squished it seemed not to absorb much any more. 


The today pic just for reference. It's still fine but after 2 x hours but I have to add washers and re tighten them again. They were so tight before too and now look at the gap.