Monday, 29 December 2014
The Turbo has landed!!!! And some other parts too...........
It was just one of those things that I just wasn't prepared to fully appreciate until it arrived. Upon opening the box it seemed like Christmas again! The courier driver graciously left the seven thousand dollars or so of aircraft parts just sitting on my front verandah over Christmas, while I was 450 kms away in Perth. Needless to say, I was ecstatic to see it there when I got home today. The fact that it was all still there and untouched, made my day.
I have had a brief look at all the components and tomorrow I will need to check all the items of the manifest. I have noted straight away that the two brand new heads are not in the package and have been listed as 'back ordered'. I have no idea what's going to happen there regarding freight but I am surprised Sonex didn't mention that it was shipping incomplete. Waiting for the heads to arrive and sending it complete would have seemed like a more sensible option. If I was given a choice I would have just waited as I still have soooooo much more building to do before I'm ready to hang the motor. However it's nice to see that turbo sitting pretty in my lounge room.
I have lost count with how many turbos I have fitted and replaced in my 20+ years as an automotive car mechanic. It wasn't until tonight that I picked up the bare unit and appreciated how heavy they really are. When using them on cars little thought is given to the weight in my dealings with them but as the brain was switched into aircraft mode the automatic scales on the end of my arm kicked in. Now tell me, who when building a plane before hasn't sat there with something in their hand , be it a bolt,fuel filter, bracket, starter motor and just thought about the weight? I think it's an automatic built in feature of a aircraft builder to question every parts that goes into the plane and think "can I make this lighter?" or " does this really need to go on?" or the big one "how much will this affect my climb rate?"
Anyway,,, I did these calculations all tonight in my head, in probably what was all of three milliseconds, and summed up the requirements as " oh hell yeah, I need those extra horses".
It would be like going into a motorbike shop and asking for a power restriction kit to be added. Same thing, buying a sport plane but without the sport motor????. For me it was a no brainer, I had to have it.
Anyway, I hope everyone had a great Christmas and the new year brings a few more dreams to reality ;)
So,,,, yep,, huh,huh, um, yep, go order that Sonex kit, you'll love it :)
Friday, 26 December 2014
Stalled just for a bit.....
It's been a few weeks, unfortunately, since I have been able to do any work on the Sonex. I have had to do a few things with the Aeropup regarding the cooling baffles and so on. It's also come to that time of year again when it pretty much blows 20 kts constantly and is usually over 30-35 degrees, so flying hasn't really been pleasant. Being close to Christmas as well , time just seems to be slipping by a little too quickly.
I have found the probable cause of an issue that has been a long time gripe I've had with the Pup, which is a positive find. I have always felt the engine vibrates quite significantly. Since comparing the factory Sonex Aerovee engine mount with my current mount, I have found the engine mount rubbers are far too compressed on my engine. The pins that the rubbers sit on need to be extended. I have contacted the Sonex help via email about possible fixes I could do and await their response. I expect they must be seriously busy over Christmas so am not surprised that its been over two weeks now with no response. It's not like I don't have plenty of other work to do regarding building the Sonex!
I would like to try to finish the paintwork on the fuselage. When Christmas is over I will have to try to do early morning, or late afternoon coats. The middle of the day is just far too hot and the paint would almost dry as it leaves the gun.
SO....... what I have done on the Sonex since the last installment is a short list:
- I have removed the lower floor on the Sonex in preparation to install the elevator push rod and rudder cables.
- The dual control sticks were bolted in.
- the holes drilled for the elevator attachment.
Here's hoping to a productive new year... maybe even to see it fly in 2015 :)
Friday, 5 December 2014
Let there be White
Well the 3 weeks of working on the plane was a big leap in progress. I feel quite happy about what I managed to get done in that time. I have read so much about the paint vs polish debate I was unsure about where I was heading decision wise. I think what really changed my mind was one day I was working in the shed in the late afternoon on the elevator assy and the light was shining on it. It was not a polished piece or anything but the reflection off the sun was almost blinding. I had read some forum somewhere about a Sonex owner deciding to paint his plane after being sick of being blinded by the reflection from the wings. So the decision was made. I think however that I still may have polished it if I was running the standard Aerovee , however, since I have decided to add the turbo to the engine, I don't mind sacrificing a little payload with some paint.
Soooooo the next big question was what to use and what colour scheme to go with. Not being much of an original thinker I was looking all over the net and found one that just jumped out at me from the moment I saw it. I saw the plane in an article from the 'Contact' magazine and it's quite a tragic tale, but I won't go into it here.. I hope the owner of this plane doesn't mind me plagiarizing his colour scheme.


Soooooo the next big question was what to use and what colour scheme to go with. Not being much of an original thinker I was looking all over the net and found one that just jumped out at me from the moment I saw it. I saw the plane in an article from the 'Contact' magazine and it's quite a tragic tale, but I won't go into it here.. I hope the owner of this plane doesn't mind me plagiarizing his colour scheme.
Realizing painting the plane would be a heck of a lot easier before the motor was fitted, I have started on the job. It's been a few years since handling a spray gun, but it seems to be going on quite well. The elevator and tail tips were the first to be painted. I had to go back to the paint shop to add a little more red tint as at first it was a little too orange for my liking. After the extra tint was added it came out spot on.
The main fuselage was next. The base coat of white is finished now, however, I don't have a photo. It did come out quite well. Time will tell if I have done a good job. I have sprayed it in automotive 2 pack paint hence all the protective clothing and breathing apparatus including goggles.
It just wouldn't be cricket I guess, if I didn't just throw some random photo in from the last three weeks. I had a great little fly out to a place called Morawa in W.A. There is a local gliding club out there and I managed to get talking to the local CFI and the topic of the VW came up. So I had to see how his baffling and cooling ducts were arranged in the hope that I could solve the ongoing issue of overheating in my Aerovee. He has given me a few ideas and I hope to try them next week when I get home.
Until next time .......... Stay Cool. :)
Friday, 21 November 2014
Thick and fast ,,,sort of...... Pictorial Edition
Well it took the best part of a day for this but I am happy still nonetheless. I started on the rudder thinking I'd have it done by smoko or lunch, but ,yes,it took all day.


It basically started here..... then went to
Here...... to start de-burring all those holes......
Then finally went to .....
Here,then topped the day off by being in
Here!... With my pink floaty and Beer.
Thursday, 20 November 2014
Smashing the work out!!!!!!
Well I haven't actually been 'smashing' anything, but a saying we have in my industry or trade when things go well, or you get heaps done, is called just that "smashing it out". This week has been one of those times when everything has just been falling together without a hitch or mistake. After having gotten over the lowered seat option, I knuckled down and got back into it. Up to now I have been putting off finishing the elevator due to the fact that I wasn't sure how to get it all straight and lining up without a hitch. I had a few issues with the last plane I built, with a few things like this, and I was determined not to make the same mistakes. I needed a large enough flat surface and I didn't have this in the shed so along came the kitchen bench-top :)


Served absolutely perfect for the job and the wife even helped me most of the day without complaint (sort of) and the end result came out perfect.
I managed to do a little shed flying the day before as well. Seeing as the seat was installed I thought I would see if there was enough clearance for us both. I temp fitted the seat cushions supplied by Sonex and tried it on. I have to say I am a bit worried about clearance as I only really had an inch or so between my head and the canopy and with a hat and Zulu 2 headset things might get tight. I was sitting forward a bit and perhaps that may not have been helping. I expect when I'm flying I'l be more than likely leaning back and relaxing so maybe all will be good. Pity help the taller passengers I take.
I can always do the lowered seat mod later though if I need to I guess.
I was absolutely pumped by how the horizontal tail tips fitted at the end of the day. I was such a nice fit around the leading edge of the horizontal stabilizer. I obviously won't be riveting it on until I paint the tail feathers but it is all drilled and ready to go. Both elevators line well with the tips ,so Happy Days. Time to fit the Stabilizer to the plane I guess :)
Tuesday, 18 November 2014
A WEEK OFF
So here I am with a full week off, and seeing as I work one week on, one week off, that means three weeks off! Oh yeah! I basically squandered the first week with travelling to Perth for family stuff but now I'm back and ready for BIZ. The last two days have seen a great leap forward in my mind. I am starting to really get the hang of these plans and reading them. I am still having issues with hardware as I go along but I have been lucky so far regarding the fact that I have had quite a few spares from the last plane build.


I made up the brackets for the hydraulic brake master cylinder. As I stuffed one up, I got the pleasure of making two on one side of it, but it was all good.
The fuel tank is now sitting in position. I have screwed in all the bungs and fuel level probe and only have the breather to decide upon. I would like to use the piece of ali tube going straight up to allow more fuel to be added to the tank, but am very worried about fuel spillage onto the windscreen if I ever find myself in the negative G situation. Plus it looks a little unprofessional. I will have to read up on it more before I decide, but I expect I will just go with the normal fuel vent to the bottom install.
I have no idea how people manage to get the AN3-10 bolt into the center join of the tank straps. I went and bought 5mm threaded rod cut them to 3" long and joined them then wound them in tight. I am hoping, once the straps have been in there for a while, I can hold them together with some clamps of some sort and replace the threaded bar with the correct hardware. I have plenty of time to change that later.
I had another one of those 'Walter Mitty' moments where I seemed to be staring at the plane for ages, moving onto the plans, staring at the plane again, and so on. When ordering the quick build I asked for the lowered seat option. I have since found out that I have been sent the standard seat arrangement. This took me a long time to work out by reading the plans and working out the differences. As I look back on it now it is very easy to tell in hind site. As it stands now I am not too concerned as both myself and wife are quite short in general. I can see what needs to be done to change the seating but I will leave it for now and worry if it becomes a problem in the future.
So I've 'gone for broke' and charged forward with the normal arrangement. Who knows, Maybe it will be really good and I'll be able to see over the dash while taxying :) I hope so.
The lower hinge, I ended up riveting on before the day was out, and tomorrow I plan on fitting the other two hinges at the bottom and the top. I have realized I have not made a cut away for the hinge pins at these two areas so will also do that in the morning.
I don't have a picture but I also riveted on the wing spar carry through box and the associated brackets today. I think most of the rivets have been left out as the option of the tri landing gear brackets would need to go there if they were required. As I'm running the standard gear I riveted it all up. I am really hoping I haven't made an oversight, and missed something. Again, I sat for ages looking at the plans before I decided on this bold move. I don't fancy having to drill out over 100-200 or so rivets if I have made a mistake.
So what will tomorrow bring?
Another week in review
Well saying a week in review is quite an exaggeration. I have worked on the plane for one day this fortnight. However,,,, today was a productive day.
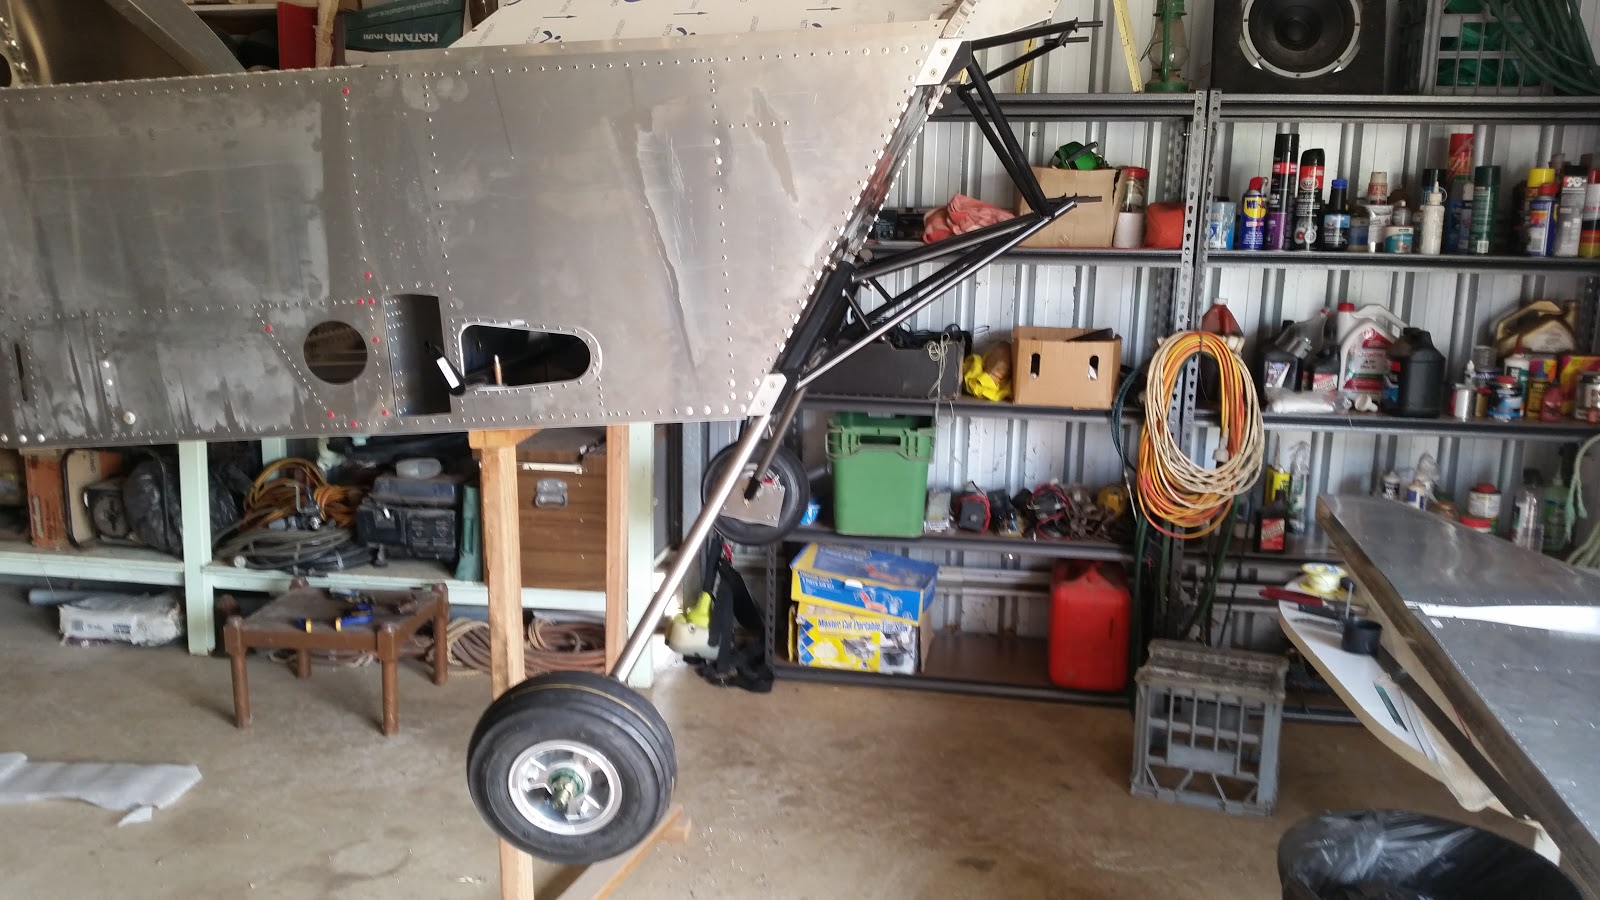


Basically it is now on it's wheels and I can reach everything. I have started on fitting the hydraulic brakes, the flap torque tube and the fuel tank and so on. I fitted the rudder cable attach brackets today and hooked the springs up. It was definitely nice to see it on it's wheels and I think I may start to make some real progress now.
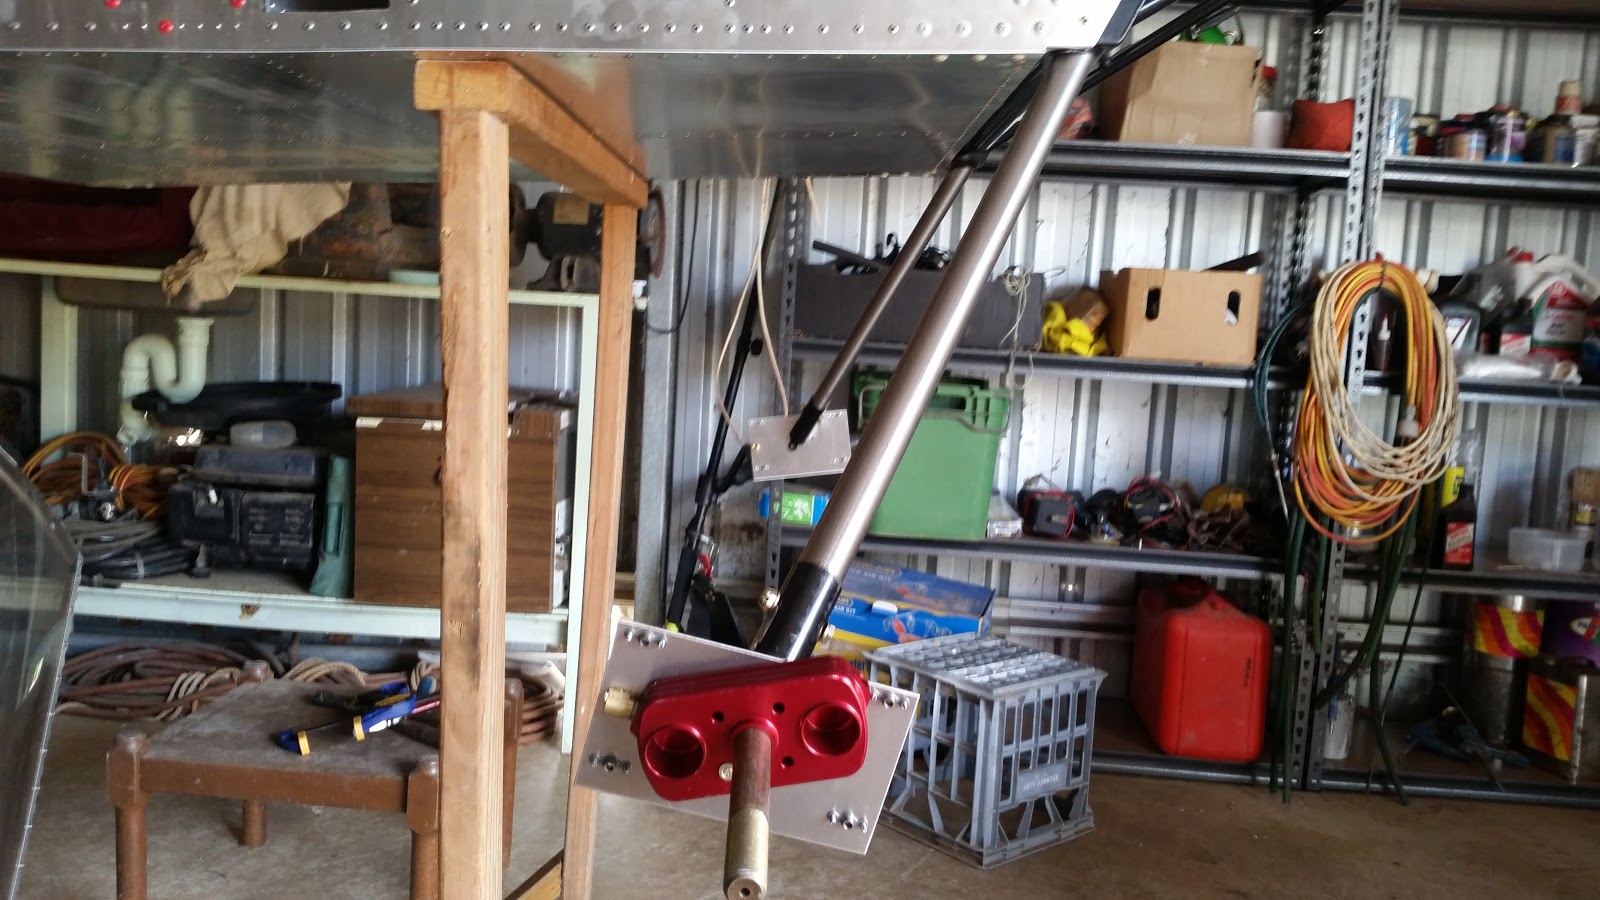
I was a little perplexed about the hydraulic brake fitment today. I was looking at the plans and was trying to work out where I had gone wrong.
The backing plate was essentially pointing towards the ground and when I was looking at the plans it looked as if it was supposed to be level according to the fuselage. I was also looking at the brake plans and noticed the wheel spat seemed to back this opinion up. So after staring at the thing for a LONG time trying to work out what was happening I looked on the Sonex builders site and found out everyone else had this same problem. I just couldn't get over, for a while, why Sonex would release this brake option and it not be according to plans. I kept thinking I had done something wrong. Upon looking at it, really, it makes no difference to the way it all works, but why not have it exactly as the plans state? Anyway rant over... Besides this:
Errr,, I ordered the clevis pins straight from the plans and this is how they turned out. About 6mm too long. I could normally deal with this so easily, just putting it down to aviation, however while I was in Perth I had to drive for over an hour each way to get to the Aircraft shop to buy these. And that was after waiting two weeks for them to be ordered in. It was pretty disappointing to then find they were incorrect. I know I can order new ones, or space them out, or leave them as is, because the wheel bearing dust seal will stop them walking into the brake disk. It's just that I really wanted them to fit.
Rant now definitely over.
Saturday, 8 November 2014
Slow progress
Well it has been another slow week for building on the Sonex. Having once again spent most of the week trying to sort out issues on the Aerovee in my Aeropup, I basically just ran out of time. I flew the pup 4 times during the week but as the temps were really high they were limited flights and each flight was after a modification to either the lower cowling or the baffles. I think this week I am going to try and concentrate on opening up the front of the cowling for more air flow as I have basically exhausted all of my ideas on the lower cowl and baffles. I am just hoping this may be the answer.

After looking at the landing gear for around a week I finally got the courage to drill the lower axle mounting bolts through the titanium landing gear legs. I had set up a tight string line and set the toe in to what I hope is correct, according to the Sonex plans. It looks okay but I'm sure I'll find out when I put it down on it's wheels this coming week. I have re-ordered the correct AN hardware for the landing gear and have only used the stainless steel bolts to hold things in place for the time being. I noticed that the hardware kits also lacked the correct hardware to mount the new hydraulic type brake callipers to the axles assy. I have to admit it is really disappointing that when you order what you would think of as a complete braking option, you have to go out and buy more stuff. So anyway I have made a list of hardware and clevis pins and anchor nuts and so on and hopefully they will arrive for Tuesday or Wednesday. At least then when that gear arrives I can fit the wheels and lower the fuselage onto the ground and take it off those oversized stands that aren't much good.
So looking ahead now I have quite a few things I can go on with next week. I really want to carry on with the tail build but the aft spar strap is still in transit with the new canopies. I'm sure it can't be too far away so looking forward to having that section complete. Now that I also have all the bronze bushings I need, I can carry on installing the controls and cabling for the rudder.
On a non Sonex related topic, two of us from the local Midwest Recreational flying club recently went and picked up our National CAGIT ('Come And Get It') trophy!


It was a fantastic feeling getting our hands on the trophy as it had sat dormant for the last 12 months, due to the fact that it was located inside controlled airspace. As it turned out the trophy was moved to a non controlled aerodrome on the day of the pick up. That was fine and the only notable point was it was about 15 mins each way further.
The pick up was great and easy to do, so a flight plan to do a victory lap over Perth city was submitted. After a small error with radio channels (require hearing check) permission was given on route and the victory lap was taken ;)


I have to admit I seriously doubt that I will forget this moment in a long time. It was one of those awesome highs you can get from flying. It was definitely up there as one of the best.
After looking at the landing gear for around a week I finally got the courage to drill the lower axle mounting bolts through the titanium landing gear legs. I had set up a tight string line and set the toe in to what I hope is correct, according to the Sonex plans. It looks okay but I'm sure I'll find out when I put it down on it's wheels this coming week. I have re-ordered the correct AN hardware for the landing gear and have only used the stainless steel bolts to hold things in place for the time being. I noticed that the hardware kits also lacked the correct hardware to mount the new hydraulic type brake callipers to the axles assy. I have to admit it is really disappointing that when you order what you would think of as a complete braking option, you have to go out and buy more stuff. So anyway I have made a list of hardware and clevis pins and anchor nuts and so on and hopefully they will arrive for Tuesday or Wednesday. At least then when that gear arrives I can fit the wheels and lower the fuselage onto the ground and take it off those oversized stands that aren't much good.
So looking ahead now I have quite a few things I can go on with next week. I really want to carry on with the tail build but the aft spar strap is still in transit with the new canopies. I'm sure it can't be too far away so looking forward to having that section complete. Now that I also have all the bronze bushings I need, I can carry on installing the controls and cabling for the rudder.
On a non Sonex related topic, two of us from the local Midwest Recreational flying club recently went and picked up our National CAGIT ('Come And Get It') trophy!
It was a fantastic feeling getting our hands on the trophy as it had sat dormant for the last 12 months, due to the fact that it was located inside controlled airspace. As it turned out the trophy was moved to a non controlled aerodrome on the day of the pick up. That was fine and the only notable point was it was about 15 mins each way further.
The pick up was great and easy to do, so a flight plan to do a victory lap over Perth city was submitted. After a small error with radio channels (require hearing check) permission was given on route and the victory lap was taken ;)
I have to admit I seriously doubt that I will forget this moment in a long time. It was one of those awesome highs you can get from flying. It was definitely up there as one of the best.
Wednesday, 22 October 2014
It's Turbo Time

It's Turbo Time
"Baby"
Multitasking
Well it was a big week for working on my planes but not too much happened on the Sonex.

Basically all I managed to achieve was bolting on the engine mount above and drilling the top mounting bolts for the titanium spring landing gear.
It was really only a half day to do both of those jobs and I did have some help from the wife to hold the mount up and so on while I secured the mount to the fuselage.
I discovered that it was quite easy to drill the gear legs in the end. I used just a normal good quality drill bit and a fair amount of pressure and slow speed. It worked a treat. I did have to sharpen the drill bit a few times on the bench grinder. Basically I just offered the gear leg into position , marked the hole, drilled a 1/8 pilot hole with a drill press then refitted the leg and drilled through the final size via the bolt tube. The process was quite quick and painless really. I was planning on drilling the lower axle assay as well however basically ran out of time. Also I was a bit unsure of the procedure for setting the toe in as per the manual. So that will be a next week job now. Not long till it's on its wheels however, that's for sure.
Most of my week again was taken up by the Aeropup and Aerovee engine rebuild. I fitted the four new cylinders and piston assemblies and two new type Mofoco heads. I reset the compression ratio to a guaranteed 8:1, and in turn that involved problems regarding valve train and pushrods issues, but nothing that wasn't easily sorted I guess, for someone used to working on these motors.
Towards the end of the week I flew two circuits in the plane. With the new ground adjustable (vibrating) prop I managed a 600 fpm climb rate. I was absolutely pumped to see that as before the best I've seen was 400- 450 on a good day. So here's to looking up. On a massive downer though were the temps, that were heading straight up. As I hit 420°F on climb out both times, I leveled off at 500 ft and brought the temps back under 400°F then made two low level circuits. I expect being a brand new motor and ground run for less that probably 15 mins it was still tight and hot. Clearly though I will have to recheck my mixtures and cowlings. I still think the lower outlets need some work. I am really hoping it will help.
I am seriously wondering if I made a correct decision buying another Aerovee for the Sonex. I hear so many success stories with them I just have to assume I will get there in the end. I'm really just thinking positively that I have made all the mistakes with the first one and that the second one will just run like a Swiss watch from day one. Fingers crossed anyway.
Wednesday, 8 October 2014
Side Tracked
Well I can honestly say absolutely nothing has been achieved on the Sonex this week. I had to carry out a bit of routine maintenance on the Aeropup and also fit in a trip to Perth. Part of the maintenance was a cylinder leakage test at 50 hours. Needless to say things didn't turn out too well.
1- 62/80
2- 74/80
3- 72/80
4- 62/80
It turns out that two exhaust valves were leaking and that further attention was obviously going to have to take place. I ran out of time that day and then went to Perth the next. I managed to get home on Sunday morning and shot straight out to the airport to take the heads off and check the barrels and pistons. I was just spewing to find some really bad vertical scouring on the two rear cylinders and, pulling a few valves out of the head, to find some seriously sick looking valves and seats. The valves had really been hammered into the head. This would explain the constant need to loosen up the tappets to maintain clearance. I investigated further as to why I have had to do valve work in such relatively short time. I have always been dubious about the initial setup regarding the compression ratio and needless to say, yes, I had set it up incorrectly. Hopefully anyone reading this blog, and building an Aerovee, learns from my mistake. What I had actually done, was when reading the chart contained in the Aerovee assembly manual regarding setting the compression to 8-1, I had read the measured protruding piston as a +.020 instead of a -.020. So I was required in this situation, to add shims, but I failed to add enough so ended up with a much higher compression ratio. I had actually ended up with around 9-1 and didn't realise. So higher compression = higher heat, not cool. Bad joke.
I'm in the situation now where I will have to spend some good time and cash rebuilding this bad boy because of something I should have done right in the first place. I have to choose now as well whether to go with the new Mofoco 040 heads that Sonex are supplying or rebuild my current CB 044 heads. Everything I read on the net doesn't seem too positive on the Mofoco heads however if Sonex are supplying them, I expect they have been tried and tested and found to work well. The problem with rebuilding my current heads however may be that the aluminium may not pass the hardness test. Excessive heat softens the alloy and may render them useless so that will have to be checked I guess when I get home.
I'm hoping that when I build the motor this time and have everything right I may gain a few ponies as it seems that it has always been a pretty anaemic engine. With the new ground adjustable(lemon) Sensenich prop I was unable to turn it over 2850rpm static. The prop is another saga that I'll leave for another day but just a short note; I flew it for about 6 mins and the vibration was horrid. Having spent close to $2000 Australian for a prop that was going on the Sonex turbo, then being told it is not compatible, is frustrating beyond all belief. I just have no idea at all what I am going to do about it.
So I'm at work now this week and just trying to sort out the parts for this repair job. I really want this plane going ASAP as there is a Fly in organised in the near future. I would like to take my own plane so I need to pull my finger out on this one.
About the only thing 'Sonex' related to this update, would be that I have ordered the missing hardware from Aircraft Spruce for the dual controls. The original hardware kit was basically on back order for months and months, and you may possibly have guessed it, I got an automated email from them a day or so ago saying this order is delayed as well. I will really have to rethink where I get the rest of my stuff from for this kit as it just chews the build time up waiting for those little things that should be easy to get hold of.
I was missing a few other items from my main Sonex kit too, like the brake handle and flap levers and things like that made out of ally parts. A quick email to Sonex and they have sent them to me no worries. I'm just waiting for them to arrive now but I think by the time I get home they will be waiting for me. Sonex as a company really do look after their builders.
Friday, 26 September 2014
Freight damage repairs week.
It was a good week again. I was greeted by this upon my return home on Monday morning.


As it happened it was all the parts Sonex had sent me for the repairs via Air freight. I basically just had to install a few gussets and ally angle stiffeners with the new firewall. It was a straight forward skirmish and came out just like this.... Sweet..
I fitted the rudder pedals during the week also. This however , I hate to say it, was made really easy whist the firewall was out. It gave plenty of access to the area and the job was simple.
I started riveting the horizontal stabilizer towards the end of the week. I did have quite a drama however with the rivets not snapping off correctly. It seems most were snapping proud of the rivet dome, which was really uncool, I thought. Using the hand riveter, however, produced a perfectly fitted rivet. No way I was going to do that 400 times though.
I tried all different settings on the air riveter and new jaws as well to no avail. In the end I was googling the issue and as it happens on the Sonex builders web site someone mentioned the air pressure and noted that if it was too high this could be the issue. So down to Bunnings for a regulator and walah! Problem solved. The only issue now was the 100 or so rivets that had shafts sticking out. So anyway at Bunnings I also bought a Dremel with a simple router attachment and went to work. As I always like a happy ending this was how the story turned out too. The rivets ground down flush really easily and look very neat.
I had a bit of a look around mounting the engine mount, so I can get this thing on the landing gear. I had to shape the lower engine mount a little to give access for the landing legs but it wasn't too much of a deal. I just had to be careful not to take away too much metal from the bracket, just enough to clear the gear leg tubes. It's held on by clamps at the moment until I can be sure all is good.
Hopefully next week will be just as productive. I think I still have some missing parts from the kit so during the week at work I will email Sonex and ask them about it.
Sunday, 7 September 2014
Another week at the office
Well Monday, and that means work, is approaching fast. I've had quite a good week on reflection. I've managed to make a fair portion of the horizontal tail and elevators.
 The elevator horn bracket is all drilled and riveted,including the rivnut plate.


We had a couple of Airforce trainer PC-9's drop in for some circuits and short field stuff as well during the morning... They didn't stop for a chat though.

Managed to cut out the skins for the elevators.
A temp mock up of the assembly before I start drilling heaps of holes to make sure it all lines up. Looks good so far but had to call it a day.
I guess it's probably not a huge amount to achieve for a week off but we have had visitors for the last few days and also today was Father's day so a few Dad things were done too.
Friday was a good day for flying... and as someone else called it "Formation Friday", a few of the locals departed Geraldton for Jurien Bay. We met another bloke from Perth to make it a four ship formation prac day. I was still humming and harring about going as I hadn't made any commitment but on the morning when they were about to go I hightailed it to the airport as I would have been absolutely spewing if I had missed out on a day like this to stay home and drill and rivet a few holes.
It was a prefect day weather wise for it and a heap of fun was had by all. I'm just so keen to get my Sonex going too so that I can be the 5th party in this formation team. My current plane is just way too slow. I managed to grab a back seat ride as well that day in an F1 Rocket,,,, sheesh what can I say but, that is an awesome plane! The takeoff was intense regarding power and it also flew like it was on rails. Sadly, way out of my budget regarding running costs and ownership, but I won't forget that ride for a while.
I had a bit of a typo in the post previously regarding the amount of rivets. I think I mentioned 1000. Well that figure was a little out it seems. Had a bit of a look at the inventory and 3000+ would be closer to the money. I am starting to make quite a pile of spent rivet shafts on the floor so a good clean up will be in order next break.
I have also added an email subscribe button to the bottom of the page (I think ) so that if you add your email I guess you will see when I update the blog. This post will be a good test as I have added my wife's email to test it. I can't see if anyone has added their email or not so I don't know who, or if any, ppl had signed up to it. Maybe when I get a bit more used to this blog perhaps I may find a section in the stats page or something.
Wednesday, 3 September 2014
Getting the Biz done,,,,,,,
It was a pretty good day today. I got up early-ish and was down working in the shed at about 6.30am. I was messing around again with the horizontal stabilizer and getting ready to up drill and rivet it all together.

All was going quite well but I had to deviate from the plan and do a few missions un- plane related :( ,,,haha, nah was all good.
I had a phone call early in the piece reminding me of a interesting thing happening at the airport today. Later, at 10.45am I'm guessing, the inbound call was heard on the airband radio and my mate called me to let me know about the arrival of two inbound Chinook Helicopters at YGEL. I headed straight down there for a look, as you do, and a chin wag with some of our Army guys. We were allowed an on board walk around and took heaps of photos whilst they refueled and prepared to set off for Perth


Anyway after that I was pretty pumped so I came back home and got down to the grind again. I managed to get the whole horizontal stabilizer all drilled, deburred, riveted and ready for skinning tomorrow...maybe if time allows.
I've spent, without exaggerating, hours looking for a bracket for the vertical stabilizer. I am at the stage now where I am pretty much certain it hasn't come in the kit. I will email Sonex tonight for their opinion.

Here's tomorrows mission if I can find that missing Spar ,,,,, Vertical stabilizer.
All was going quite well but I had to deviate from the plan and do a few missions un- plane related :( ,,,haha, nah was all good.
I had a phone call early in the piece reminding me of a interesting thing happening at the airport today. Later, at 10.45am I'm guessing, the inbound call was heard on the airband radio and my mate called me to let me know about the arrival of two inbound Chinook Helicopters at YGEL. I headed straight down there for a look, as you do, and a chin wag with some of our Army guys. We were allowed an on board walk around and took heaps of photos whilst they refueled and prepared to set off for Perth
Anyway after that I was pretty pumped so I came back home and got down to the grind again. I managed to get the whole horizontal stabilizer all drilled, deburred, riveted and ready for skinning tomorrow...maybe if time allows.
I've spent, without exaggerating, hours looking for a bracket for the vertical stabilizer. I am at the stage now where I am pretty much certain it hasn't come in the kit. I will email Sonex tonight for their opinion.
Here's tomorrows mission if I can find that missing Spar ,,,,, Vertical stabilizer.
Tuesday, 2 September 2014
Let's get crack'n
Well I'm back from work and had a bit of a look at the plane today. I managed to lay out most of the horizontal stabilizer parts and cleco those bad boys together. Looks pretty cool and only took a short time really.

Of course it all has to come apart again and be drilled and riveted in stages but it was nice seeing it there. So I took it all apart and updrilled the main spar at the back, deburred it and took off all the rough edges. It's bringing back some, I guess sort of painful memories, about how long a project like this will actually take and the work involved. During the kit inventory I noted that Sonex have supplied about 1000 rivets. That doesn't count the baffles and other things so just to put it in perspective. That's drilling at the very least another 1000 holes, duburring and finally riveting. Needless to say,,,,, I have a fair bit of work to go :) Still that's all part of it ,,,, and I guess I wouldn't have it any other way.
The first part updrilled and deburred. Ready for Rivets :)
Monday, 25 August 2014
Huge couple of weeks.
I'm really quite astounded by how the last 2-3 weeks have flown by. I arrived back at work today and really am just looking forward to just having to do my job, now that all the missions are over, and not having to worry about anything for a while. I finished night shift last week and had about 5 hours sleep then drove to Perth to pick up the plane. There was no chance my poor little car was going to be able to tow this largish trailer and the plane, so I had to borrow one and use that to tow it back to Geraldton. I arrived down at Fremantle port only to be horrified by what I saw. The box had been damaged in transport! At the time I really had no idea if there was anything damaged inside and really all I could do was load it up, return home and see when I unpacked it.

The trip home was rather uneventful. It was an easy drive, taking it quite slowly, but that was all good. I got home had a small break then set about unloading. So hours later I had it all unloaded and in the shed and looked upon what had happened. Thankfully there were only a few small, very easily repairable, dings. Sonex have been awesome about it all and are helping me out with what I need to do. I tell you, it really makes such a difference having these guys in your corner. I can't express how helpful they have been through these last 12 months and now this as well.
So luckily I had my stock controller helping me with the inventory ;). It's quite a long winded task to find and tick off all the bits and pieces.

I did have a bit of a look at how the plans work and I'm slowly starting to get the hang of how the number system and so forth work. Just laying out the tail pieces and so on gives you a little understanding and I'm sure soon it will all make sense.
I had a few little chores to do on my current flying plane this week and had a good amount of things to do around the house as well so I didn't really concentrate too much on the Sonex. I think I'll probably have a good try next break when I can focus on it and not have all the extra distractions to worry about.
It had been so busy of late that when I looked at my log book, it had actually been one month since my last flight! I managed a short but sweet flight in the pup to brush off some cobwebs and keep the engine turning. Definitely next week I will need a longer flight however :)

The trip home was rather uneventful. It was an easy drive, taking it quite slowly, but that was all good. I got home had a small break then set about unloading. So hours later I had it all unloaded and in the shed and looked upon what had happened. Thankfully there were only a few small, very easily repairable, dings. Sonex have been awesome about it all and are helping me out with what I need to do. I tell you, it really makes such a difference having these guys in your corner. I can't express how helpful they have been through these last 12 months and now this as well.
So luckily I had my stock controller helping me with the inventory ;). It's quite a long winded task to find and tick off all the bits and pieces.
I did have a bit of a look at how the plans work and I'm slowly starting to get the hang of how the number system and so forth work. Just laying out the tail pieces and so on gives you a little understanding and I'm sure soon it will all make sense.
I had a few little chores to do on my current flying plane this week and had a good amount of things to do around the house as well so I didn't really concentrate too much on the Sonex. I think I'll probably have a good try next break when I can focus on it and not have all the extra distractions to worry about.
It had been so busy of late that when I looked at my log book, it had actually been one month since my last flight! I managed a short but sweet flight in the pup to brush off some cobwebs and keep the engine turning. Definitely next week I will need a longer flight however :)
Subscribe to:
Posts (Atom)